Container Gardens
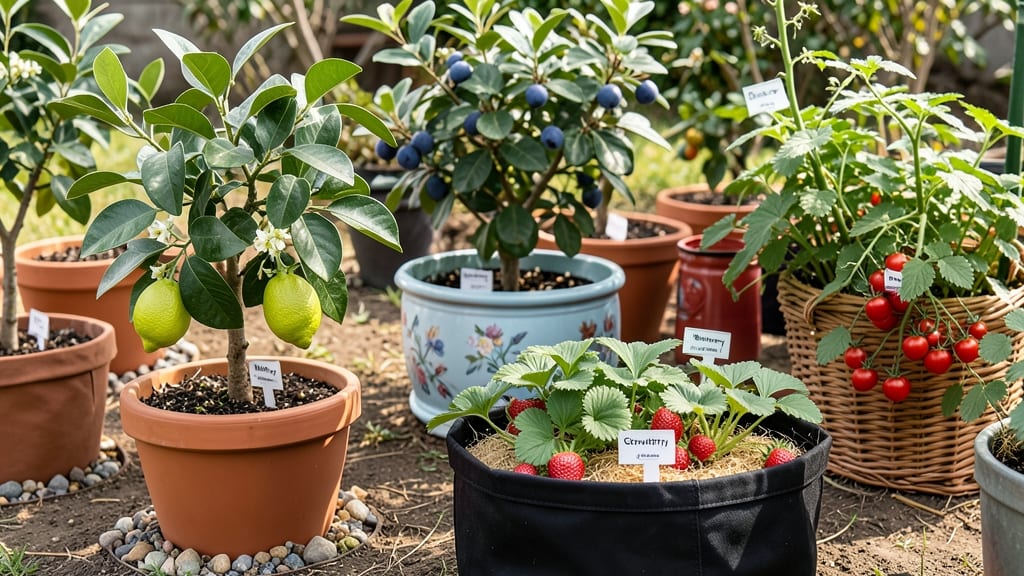
Growing fruit in containers turns even the smallest balcony into a harvest zone. 🌱 My first attempt with dwarf citrus trees proved you don't need a yard—just the right varieties, pots, and a sunny spot.
The key is choosing compact plants that thrive in containers, like strawberries, blueberries, or patio-friendly figs, all of which produce abundantly in just a few square feet.
You'll need containers with good drainage (at least 5 gallons for most fruit), lightweight potting mix designed for containers, and a spot that gets 6-8 hours of sunlight daily. Most people overlook soil depth—fruit plants need 12-18 inches of root space to establish properly.
I've found that self-watering containers help maintain consistent moisture without the risk of overwatering, which is the #1 killer of container-grown fruit.
Within 3-6 months, you'll see your first fruits forming, and with proper care, these plants can produce for years. The dwarf Meyer lemon I started from a cutting now gives me dozens of fruits each season, and my strawberries keep coming back stronger every year.
The best part? No weeding, no soil-borne diseases, and you can move containers to optimize sunlight as seasons change.
Perfect for urban gardeners, renters, or anyone with limited space. Here's how to pick the right varieties, set up your containers, and keep them thriving all season long—no green thumb required.
📚 In This Guide
- What you need
- Instructions
- Tips and common mistakes
- Wrapping up and next steps
What you need
- ● Containers: 5-gallon pots or larger (minimum 12-inch depth for most fruits). Tip: Ensure they have drainage holes!
- ● Potting Mix: 1 bag of high-quality, well-draining container mix (avoid garden soil—it compacts!).
- ● Fruit Plants: Compact varieties like strawberries, dwarf citrus (e.g., Meyer lemon), cherry tomatoes, or bush blueberries.
- ● Fertilizer: Balanced, slow-release granules (e.g., 10-10-10) or organic options like worm castings.
- ● Watering Can or Hose: With a gentle spray nozzle for even moisture.
- ● Self-Watering System: A reservoir or drip irrigation kit for busy bees.
- ● Mulch: Straw or shredded bark to retain moisture and regulate temperature.
- ● Support Structures: Small cages or stakes for vining plants (e.g., strawberries or tomatoes).
- ● pH Test Kit: For acid-loving fruits like blueberries (aim for pH 4.5–5.5).
- ● Decorative Elements: Paint, pebbles, or labels to personalize your setup!
Step-by-step instructions for growing fruit in containers
Here's how to turn your balcony into a productive fruit orchard using dwarf varieties and proper container techniques.
🌱 Step 1: Select the Right Compact Fruit Varieties
Choose dwarf or columnar varieties specifically bred for containers. Patio-friendly options include 'Tumbling Tom' cherry tomatoes, 'Bushel and Berry' blueberries, 'Patio' peach trees, and 'Columnar' apple varieties. These stay under 6 feet tall and produce real fruit, not just decorative blooms.
Check the mature size listed on the tag—some "compact" varieties still need 5-gallon minimum containers while others thrive in 1-gallon pots. I always verify root spread too; fibrous roots need room to circulate air, while taproots (like peaches) need deep pots with drainage.
🪴 Step 2: Choose Proper Containers and Drainage
Size matters most—at least 5 gallons per plant for most fruiting varieties, with deeper pots (12+ inches) for peaches and apples. I use unglazed ceramic or fabric grow bags because they breathe better than plastic. Every container must have multiple drainage holes—root rot kills container fruit trees faster than anything.
Add a 2-inch layer of gravel or broken pottery at the bottom before soil. This prevents clogging while still allowing water to drain freely. If your balcony gets windy, secure pots with weighted bases or tie-downs—nothing ruins a harvest faster than a tipped-over container.
☀️ Step 3: Prepare Soil and Plant Correctly
Use a well-draining potting mix with 20% perlite or vermiculite added for aeration. I avoid garden soil—it compacts in containers and suffocates roots. Mix in a slow-release fertilizer (10-10-10 ratio) at planting time for a 3-month nutrient boost. Fill containers to 1 inch below the rim to prevent spills during watering.
Plant at the same depth as the nursery pot, then water deeply until it drains from the bottom. The soil should feel evenly moist but not soggy—you'll see water beads on the surface when it's properly saturated. Place young plants in a shaded area for 3 days to reduce transplant shock before moving to full sun.
💧 Step 4: Provide Sunlight and Watering Care
Most container fruits need 6-8 hours of direct sunlight daily. A south-facing balcony works best, but west exposures also work for heat-tolerant varieties like 'Sungold' tomatoes. If your space gets less light, choose partial-shade varieties like 'Patio Princess' peaches or 'Black Diamond' figs.
Water when the top 2 inches of soil feel dry—stick your finger in to check. Overwatering causes root rot, while underwatering leads to small, bitter fruit. I use a self-watering system for summer months when I travel, but always empty the reservoir after 2 weeks to prevent algae growth.
✂️ Step 5: Prune and Fertilize for Maximum Yield
Prune in early spring to remove dead wood and shape the plant. For tomatoes and peppers, pinch off flower buds until the plant has 4-5 sets of true leaves—this encourages stronger stems before fruiting. I also remove suckers (the shoots that grow between main stems) to direct energy to fruit production.
Fertilize every 4-6 weeks with a balanced liquid fertilizer (like fish emulsion) during the growing season. Stop fertilizing 6-8 weeks before first frost—new growth won't harden off properly and may get damaged by cold. Mulch with 2 inches of straw to retain moisture and regulate soil temperature.
Tips & tricks for perfect container-grown fruit
Here's what nobody tells you about transforming your balcony into a thriving fruit garden—without the common pitfalls that kill container plants.
Variety Selection: The key to success lies in matching your fruit variety to your container size and root type. For example, 'Tumbling Tom' cherry tomatoes thrive in 1-gallon pots because their fibrous roots spread horizontally, while 'Patio' peach trees need 5-gallon minimum containers with deep drainage for their taproots. Always check the mature size on the tag—what's labeled "compact" might still need a 5-gallon pot, not a 1-gallon container. I learned this the hard way after watching a peach tree struggle in a too-small pot.
Container Material Matters: Unglazed ceramic and fabric grow bags breathe better than plastic, preventing root rot—the silent killer of container fruit plants. If you must use plastic, drill extra drainage holes and elevate pots to improve airflow. The 2-inch gravel layer at the bottom isn't just for drainage—it creates air pockets that prevent soil compaction, which suffocates roots over time. Pro tip: Add a layer of landscape fabric over the gravel to keep soil from washing through.
Soil Science: That 20% perlite or vermiculite in your potting mix isn't just filler—it's what prevents your container soil from turning into a waterlogged brick. I mix in an extra 10% coconut coir for moisture retention during dry spells, especially for heat-loving varieties like 'Sungold' tomatoes. The slow-release 10-10-10 fertilizer at planting time gives your plants a 3-month nutrient head start, but don't skip the liquid fertilizing every 4-6 weeks during growing season—container plants outgrow their nutrients faster than in-ground plants.
Sunlight Strategy: Those 6-8 hours of direct sunlight aren't just about light intensity—they're about timing. Place your containers where they'll get morning sun and afternoon shade in hot climates, or full sun in cooler areas. For west-facing balconies, rotate containers every few days so all sides get even exposure. I use reflective aluminum foil on the north side of pots to bounce extra light onto shade-loving varieties like 'Black Diamond' figs during cloudy days.
Pro Tips for Fruit In Containers
- Here's what nobody tells you about transforming your balcony into a thriving fruit garden—without the common pitfalls that kill container plants.
- Variety Selection: The key to success lies in matching your fruit variety to your container size and root type.
- Container Material Matters: Unglazed ceramic and fabric grow bags breathe better than plastic, preventing root rot—the silent killer of container fruit plants.
Frequently asked questions
Got questions about growing fruit in containers? You’re not alone! Here are some of the most common queries—and their practical answers—to help you get started with confidence.
What are the easiest fruits to grow in containers for beginners?
Start with low-maintenance varieties like strawberries, dwarf apple or peach trees, blueberries, cherry tomatoes (technically a fruit!), or bush dwarf citrus. These thrive in pots, require minimal space, and forgive occasional mistakes. Just ensure they get enough sunlight (6+ hours/day) and well-draining soil.
How often should I water container-grown fruit plants?
Container plants dry out faster than in-ground ones—check soil moisture daily in hot weather. Water deeply when the top inch feels dry, but avoid soggy roots. Dwarf fruit trees and berries prefer consistent moisture, while citrus and tomatoes tolerate slight drying between waterings. Use self-watering pots or drip irrigation for convenience!
Can I reuse the same container for different fruit varieties?
Yes, but sanitize it first! Scrub with a 10% bleach solution (or soapy water) to kill pests/diseases, then rinse thoroughly. Avoid reusing containers for stone fruits (peaches, plums) and citrus in the same season—they’re prone to fungal issues. Rotate crops yearly to prevent soil depletion and improve yields.
How do I protect container fruit plants from extreme heat or cold?
Move pots to shaded areas during heatwaves (use shade cloth if needed) and wrap them in bubble wrap or frost blankets for winter. Dwarf fruit trees benefit from mulch around the base to insulate roots. In freezing temps, bring tender plants (like citrus) indoors or to a garage. Group containers together to create a microclimate!
Why aren’t my container-grown fruits ripening? What’s wrong?
Likely culprits: insufficient sunlight (move to a sunnier spot), overwatering (let soil dry slightly), or nutrient deficiencies (fertilize with fruit-specific feed every 4–6 weeks). Tomatoes and peppers need warmth to ripen—try a heat mat in cool climates. Check for pests (aphids, spider mites) and prune crowded branches to boost airflow.
Still stumped? Drop your specific fruit type and issue in the comments—we’re happy to troubleshoot!
Wrapping up and next steps
Growing fruit in containers is a rewarding way to enjoy fresh, homegrown produce—even in small spaces! Whether you’re a beginner or a seasoned gardener, compact fruit varieties make it easy to turn balconies, patios, or windowsills into thriving mini orchards.
With the right containers, soil, and care, you’ll harvest juicy berries, sweet citrus, or crisp apples in no time.
Ready to get started? Pick your favorite fruit, grab a pot, and let your green thumb shine! 🌱 Next, explore container-friendly fruit varieties or dive into step-by-step planting guides to kick off your harvest.